2010年10月1日星期五

Print Management in Windows Server 2008 R2

測試環境
1. AD: Windows Server 2003 R2 x64
2. Print Server: Windows Server 2008 R2
3. Client: Windows 7 x64 & Windows XP x86
4. Printer: 分別在兩層樓不同位置 (29/F, 30/F)

設定
1. 首先在AD 和Print Server 安裝Print Management


2.在AD, 打開Active Directory Users and Computers, 因為Printer 分開兩層, 而每部電腦都應該只會連線所屬層數的Printer, 如29/F 電腦只會Print 在29/F 的Printer, 所以要新增兩個OU, 29/F Computers & 30/F Computers, 把適當的電腦放在這兩個OU.


3.分別在兩個OU, 新增一個GPO, 因為Print Management 是靠GPO 而部署Printer 到不同的電腦


4. 由於有Client 電腦是用Windows XP x86, 而Windows XP 是靠Pushprinterconnections.exe 來連接Printer, 而AD 是x64, 不適合用在x86 環境上.所以要找一個x86 版本的Pushprinterconnections.exe
可以在這裡下載pmcmgmt.exe
http://www.microsoft.com/downloads/en/details.aspx?familyid=9bfb44f5-232a-4fb5-bc14-45bfd81b7ac1&displaylang=en
安裝後會在C:\Windows\pmcsnap 找到pushprinterconnections.exe, 把這個檔案放到剛剛新增的GPO內


5. AD 預備之後, 到Windows Server 08 R2 Print Management, 新增所需要的Printer

6.而每部Printer 都要Sharing 和List in Directory, 另外因為有x86 Client, 所以要加入x86 Driver

7. Printer 設定完成後, 可以根據不同GPO deploy 到不同Client 電腦


8.打開AD 內Print Management, 在Deployed Printer, 會發現剛剛Deploy 的Printers

9. 最後User 登入到電腦, 便會發現Printer 已經連接好.

2010年6月15日星期二

利用Windows AIK 加入新Driver

前天買了新的AMD 六核電腦,當安裝Windows Server 08 R2 時候發現沒有DVD-Rom, 怎麼辦?立即想起利用另一部08 Server 的Windows Development Service (WDS) 經Network 部署08 R2, 但由於新電腦主機板的網絡晶片比較新, 08R2 影像檔沒有此Driver, 所以不能直接使用WDS, 事先要利用Windows AIK 加入Driver 到影像檔

準備事項
a. Windows Automated Installation Kit for Windows 7
b. Windows Server 08 R2 Installation Image
c. NIC Driver for Windows Server 2008 (xx.inf)

1. 安裝Windows AIK 並打開Deployment Tools Command Prompt (Run As Administrator)
輸入 "dism /get-wiminfo /wimfile:f:\Images\boot.wim" 找到Windows Setup X64 是index 2


2. Unmount Windows Setup X64 出來
"dism /mount-wim /wimfile:f:\boot.wim /index:2 /mountdir:f:\mountboot"


3. 現在可以加入Driver
"dism /image:f:\mountboot /add-driver /driver:f:\lan\netrtx64.inf"


4. 儲存並封裝Boot.Wim
"dism /unmount-wim /mountdir:f:\mountboot /commit"


5. 然後可以把新的boot.wim 新增到WDS, 這時新的電腦可以利用WDS 部署OS

2010年6月8日星期二

APP-V用戶端靜默安裝參數

在technet上找到了如下一個示例:
"setup.exe" /s /v/qn"SWICACHESIZE=\"10240\" SWIPUBSVRDISPLAY=\"Production System\" SWIPUBSVRTYPE=\"HTTP \" SWIPUBSVRHOST=\"PRODSYS\" SWIPUBSVRPORT=\"80\" SWIPUBSVRPATH=\"/AppVirt/appsntype.xml\" SWIPUBSVRREFRESH=\"on\" SWISKIPDATASETTINGS=\"false\" SWIGLOBALDATA=\"D:\AppVirt\Global\" SWIUSERDATA=\"^%HomeDrive^%\Windows\Application Virtualization Client\" SWIFSDRIVE=\"Q\""

但是對於公司目前的環境,其中很多參數值不對或者一些參數用不到,於是幾經測試,終於找到了適合公司環境的靜默安裝參數,執行該cmd命令或者在sccm中使用該命令能夠正確的靜默安裝app-v用戶端並完成配置。命令如下:

"SETUP.EXE" /s /v/qn"SWICACHESIZE=\"1024\" SWIPUBSVRDISPLAY=\"app-v\" SWIPUBSVRTYPE=\"RTSP\" SWIPUBSVRHOST=\"10.68.48.8\" SWIPUBSVRPORT=\"554\" SWIPUBSVRREFRESH=\"on\" SWIFSDRIVE=\"Q\""

介紹一下上面我用到的命令中幾個重要參數的含義:
SWICACHESIZE——緩存大小,指定用戶端緩存的大小 (MB)。預設大小為 4096 MB,最大大小為 1,048,576 MB (1 TB)。系統將在安裝時檢查可用空間,但不會保留空間
SWIPUBSVRDISPLAY——顯示名稱,指定發佈伺服器的顯示名稱,在使用 SWIPUBSVRHOST 時需要
SWIPUBSVRTYPE——HTTP|RTSP,指定發佈伺服器類型
SWIPUBSVRHOST——IP 位址|主機名稱,指定 Application Virtualization Server 的 IP 位址或伺服器主機名稱(解析為伺服器的 IP 位址)
SWIPUBSVRPORT——埠號,標準 HTTP 伺服器—預設值 = 80,增強的安全性 HTTP 伺服器—預設值 = 443,Application Virtualization Server—預設值 = 554,增強的安全性 Application Virtualization Server—預設值 = 322
SWIPUBSVRREFRESH——指定在使用者登錄用戶端時用戶端是否會自動查詢發佈伺服器中的檔案類型關聯和應用程式(預設值 = ON)
SWIFSDRIVE——首選的磁碟機代號,與為虛擬驅動器選擇的磁碟機代號對應

2010年6月3日星期四

在Windows 7 預設Default User Profile & Default Network User Profile

To customize a Default Local User Profile
1.Log on to a computer running the Windows 7 operating system by using a local administrator account.

2.Customize the user experience as needed. For example, customizations might include the Desktop settings, Start menu options, or Favorites.

3.Copy and paste the sample .xml file from Appendix A into a text editor. Save the file with the name copyprofile.xml.

4.Open an elevated command prompt, and type the following:

cd\%SYSTEMROOT%\System32\sysprep

Press ENTER, and then type the following:

Sysprep.exe /oobe /reboot /generalize /unattend:\copyprofile.xml

Press ENTER.

5.Sysprep shuts down the computer when the process completes.


To turn the Default Local User Profile into a Default Network User Profile
1.Log on to the computer that contains the customized Local Default User Profile by using administrative credentials.

2.Click Start. In Search programs and files, type the name of the shared NETLOGON folder for a domain controller (for example, \\DomainControllerName\NETLOGON), and then press ENTER.

3.Create a new folder, and name the folder Default User.v.2.

4.Click Start, right-click Computer, and then click Properties.

5.Click Advanced System Settings, and under User Profiles, click Settings.

6.The User Profiles dialog box shows a list of profiles that are stored on the computer. Click Default Profile, and then click Copy To.

7.In the Copy profile to text box, type the network path and folder name that you created in step 3. For example, the network path in the contoso.com domain is \\HQ-CON-DC-01\NETLOGON\Default User.v.2.

8.Click Change. Type Everyone, and then click OK.

9.Click OK to copy the Default Local User Profile to the specified path.

10.Close all remaining windows and log off the computer when the copying process completes.


Sample sysprep.xml file for a 32-bit version of Windows 7:

http://technet.microsoft.com/zh-tw/library/ff458273(en-us,WS.10).aspx

2010年6月2日星期三

Microsoft Desktop Player Beta


The Microsoft Desktop player allows IT professionals to access technical content (videos, webcasts, podcasts, white papers, and more) and links to resources (such as IT evangelists, local training opportunities, and local user groups) in your area. You can either view it online or download the WPF application to view offline.

http://www.microsoft.com/click/desktopplayer/

2010年6月1日星期二

AppV 4.6把Office 2010 虛擬化 - 客戶端電腦

1. 安裝AppV 4.6 Client

2. 下載Office 2010 Development Kit for AppV 並解壓.

3. 執行msiexec/i OffVirt.msi PROPLUS=1

4. 執行以下指令

msiexec/i 路徑 OffVirt.msi\OffVirt.msi ADDDEFAULT = Click2runOneNoteProxy、 Click2runOutlookProxies、 Click2runWDSProxy、 Click2runOWSSuppProxies PACKAGEGUID = {SFT package GUID} PACKAGEVERSION = versions found in OSD files for proxies, Outlook, and OneNote OUTLOOKNAME = app name for Outlook from OSD ONENOTENAME = app name for OneNote from OSD MAPISERVER = MAPI proxy app name VIRTUALSEARCHHOST = Search proxy app name MLCFG32CPL = app name for virtual mail configuration OWSSUPPServer = app name for SharePoint proxy


For example:
msiexec /i c:\OffVirt.msi ADDDEFAULT=Click2runOneNoteProxy,Click2runOutlookProxies,Click2runWDSProxy,Click2runOWSSuppProxies PACKAGEGUID={5971AF75-7831-4AE9-906F-0F30C7DD0CA5} PACKAGEVERSION=14.0.4763.1000 OUTLOOKNAME=”Microsoft Outlook 2010” ONENOTENAME=”Microsoft OneNote 2010” MAPISERVER=”Microsoft Virtual Office Simple Mapi Proxy Server” VIRTUALSEARCHHOST=”Search MAPI Protocol Handler Host” MLCFG32CPL=”Windows Control Panel” OWSSUPPServer=”Microsoft SharePoint Client Support Manager”

GUID 可以打開任何OSD找到


5. 在Control Panel 拎到Mail Panel, 設定Outlook Profile, 打開Outlook 並成功Send Mail.

AppV 4.6把Office 2010 虛擬化 - 封裝篇

1. 在Q: 建立資料夾叫"OFF2010.V01"

2. 打開AppV 4.6 Sequencer

3. 按Create Package

4. 輸入Package Name: Microsoft Office 2010, 再按Next

5. 選擇Q:\OFF2010.V01

6. 按Begin Monitoring

7. 當顯示"Install the Application, and click Stop Monitoring" 時候, 執行office 2010 Setup 檔案.

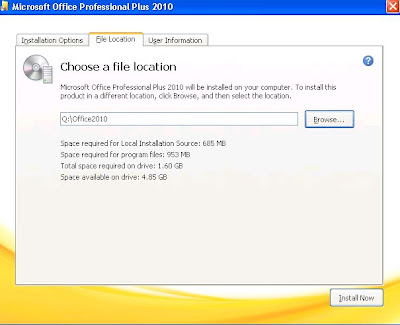
8. 到"Choose the installation that you want" 選擇"Customize", 如果您想安裝該功能,請確定您選"Install to hard drive "

9. 按一下"File Locations" 並變更路徑到Q:\OFF2010.VO1

10. 等待安裝完成後, 打開CMD, 執行以下Registry

reg add "HKLM\SOFTWARE\Microsoft\Windows\Windows Search\Preferences" /v "{4154494E-BFF9-01B8-00AA-0037D96E0000}" /t REG_DWORD /d "1" /f
reg add "HKLM\SOFTWARE\Microsoft\Windows\Windows Search\Preferences" /v "{C0A19454-7F29-1B10-A587-08002B2A2517}" /t REG_DWORD /d "1" /f
reg add "HKLM\SOFTWARE\Microsoft\Windows\Windows Search\Preferences" /v "{70fab278-f7af-cd11-9bc8-00aa002fc45a}" /t REG_DWORD /d "1" /f
reg add "HKLM\SOFTWARE\Microsoft\Windows\Windows Search\Preferences" /v "{c34f5c97-eb05-bb4b-b199-2a7570ec7cf9}" /t REG_DWORD /d "1" /f
reg add "HKLM\SOFTWARE\Microsoft\Windows\Windows Search\Preferences" /v "{0077B49E-E474-CE11-8C5E-00AA004254E2}" /t REG_DWORD /d "1" /f

reg add "HKCR\CLSID\{9203C2CB-1DC1-482d-967E-597AFF270F0D}\TreatAs"
reg delete "HKCR\CLSID\{9203C2CB-1DC1-482d-967E-597AFF270F0D}\TreatAs" /va /f

reg add "HKCR\CLSID\{BDEADEF5-C265-11D0-BCED-00A0C90AB50F}\TreatAs"
reg delete "HKCR\CLSID\{BDEADEF5-C265-11D0-BCED-00A0C90AB50F}\TreatAs" /va /f

reg add "HKCR\CLSID\{3FD37ABB-F90A-4DE5-AA38-179629E64C2F}\InprocServer32" /t REG_SZ /d "Q:\OFF2010.V01\VFS\CSIDL_PROGRAM_FILES\Microsoft Office\Office14\OWSSUPP.DLL" /f

reg add "HKCR\CLSID\{62B4D041-4667-40B6-BB50-4BC0A5043A73}\InprocServer32" /t REG_SZ /d "Q:\OFF2010.V01\VFS\CSIDL_PROGRAM_FILES\Microsoft Office\Office14\OWSSUPP.DLL" /f

reg add "HKCR\CLSID\{9203C2CB-1DC1-482D-967E-597AFF270F0D}\InprocServer32" /t REG_SZ /d "Q:\OFF2010.V01\VFS\CSIDL_PROGRAM_FILES\Microsoft Office\Office14\OWSSUPP.DLL" /f

reg add "HKCR\CLSID\{BDEADEF5-C265-11D0-BCED-00A0C90AB50F}\InprocServer32" /t REG_SZ /d "Q:\OFF2010.V01\VFS\CSIDL_PROGRAM_FILES\Microsoft Office\Office14\OWSSUPP.DLL" /f

要留意如果安裝路徑有變, 請更改"Q:\OFF2010.V01"為正確路徑

11. 瀏覽至虛擬應用程式的實際路徑"Q:\OFF2010.V01" 打開軟件, 如: WINWORD.EXE, EXCEL.EXE ... 建議每套軟件都打開三次以上, 確保軟件正常打開.

12. 按一下"Stop Monitoring"


13. 新增新的 Proxy 應用程式 Proxy 的支援

Application (OSD) files to add:
Instant Search (Virtual Search Host)
Application Path: %commonprogramfiles%\microsoft shared\virtualization handler\VirtualSearchHost.exe
Name: Specify a name. The default name is "Search MAPI Protocol Handler Host."

Virtual SharePoint Proxy
Application Path: %commonprogramfiles%\microsoft shared\virtualization handler\VirtualOWSSuppManager.exe
Name: Specify a name. The default name is "Microsoft SharePoint Client Support Manager."

Simple MAPI
Application Path: %commonprogramfiles%\microsoft shared\virtualization handler\MapiServer.exe
Name: Specify a name. The default name is "Microsoft Virtual Office Simple Mapi Proxy Server."

Virtual Mail Control Panel Item
Application Path: %windir%\system32\Control.exe %SFT_MNT%\OFF2010.V01\Office14\mlcfg32.cpl
Name: Specify a name. The default name is "Windows Control Panel."

Office Document Cache
Application Path: Q:\short path\Office14\MSOSync.exe
Name: Specify a name. The default name is "Microsoft Office Document Cache."

14. 展開Application,在Microsoft Office Document Cache中, 選取Shortcut,編輯快顯位置是 Start Menu\Programs\Startup

15. Office 安裝檔案 Setup.exe 上, 按一下滑鼠右鍵,然後選取 [內容], 按一下 [版本] 索引標籤。
變更以符合該版本的所有 OSD 檔案的版本。
例如:
如果版本的 Setup.exe 14.0.4763.1000 確定所有的 Proxy 應用程式 OSDs 和所有的 Office OSDs 的版本數目設定為 14.0.4763.1000。

16. 在Launch Applications, 選取並啟動所有您想要的應用程式產生每個應用程式在主要功能
*不建議您先啟動自訂設定值更能保留的 OneNote、 Outlook 或 SharePoint*

17. 確認下列的虛擬登錄機碼設為Merge with Local
MACHINE\Software\Microsoft\Office\14.0

18. 針對每個 OSD, 新增TRUE 在Element
SOFTPKG -> IMPLEMENTATION -> VIRTUALENV -> POLICIES -> LOCAL_INTERACTION_ALLOWED

19. 在Deployment 頁, 填上Application Server HostName, Path 輸入\OFF2010.V01


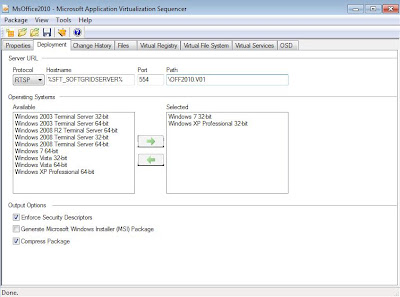
20.儲存Package 到Q:\OFF2010.V01

AppV 4.6把Office 2010 虛擬化 - 準備篇

Office 2010 已經發佈, 亦有好多人準備升級,之前提過如果用GPO 在AD 環境內安裝在客戶端電腦上,今次是如果用AppV 4.6 把Office 2010 虛擬化再發佈出去. 今次要準備以下幾項:
a. Microsoft Office 2010 Professional VL 版

b. Office 2010 Development kit for AppV , 可以到這裡下載


c. AppV 4.6 Sequencer *Microsoft Office 2010 目前不支援在 App-V 4.5 上*

1. 在一部已經安裝Windows 7 的電腦上新增Multi-string value = vsl 在以下Registry
HKEY_LOCAL_MACHINE\SOFTWARE\Microsoft\SoftGrid\4.5\Sequencer\SxSAppExtensions

2. 請確定您安裝 Windows Search 4.0 並將 Windows 搜尋 服務設定為手動或自動。

預設情況下,Windows 搜尋安裝在 Windows 7。透過 [Windows 功能],在 [新增或移除程式] 中 啟用它。

3. 藉由安裝 Microsoft XML Paper Specification Essentials Pack (http://go.microsoft.com/fwlink/?LinkId=169359) 下載 XPS 檢視器。

預設情況下,XPS 檢視器已安裝在 Windows Vista 和 Windows 7。
將 Windows Update 服務設定為 [停用]。

4. 安裝 App-V 4.6 Sequencer

5. 利用指令"Office2010AppVKit-x86.exe /extract:c:\office2010appvkit" 解壓Office2010 Development kit for AppV

6. 到c:\office2010appvkit 資料夾, 執行"msiexec/i OffVirt.msi ADDLOCAL = Click2runMapi Click2runOWSSupp,Click2runWDS OSpp,OSpp_Core PROPLUS=1"

2010年5月30日星期日

PowerPoint 2010 小功能, 大改善 - pptPlex

pptPlex 一個新Add-In 功能, 令你的Presentation 變得更有趣和靈活.
下載位置: http://www.officelabs.com/projects/pptPlex/Pages/default.aspx
From Overview:點選它可以看全部ppt的縮圖(全螢幕)
From First Slide:從第一張開始放映
From Current Slide:從目前的投影片開始播放
Insert New Section:插入新簡報
Canvas Background:套用背景
Add Live Content:可以增加文件檔唷,下文會詳細解說
Advanced Options:呈現方式選項 亦可以使用滑鼠左右鍵、滑鼠滾輪做ZOOM IN和ZOOM OUT 或 用左右上下鍵來選擇你要呈現的投影片
Add Live Content: 可以增加Word, PowerPoint 或 Excel 文件在PowerPoint內顯示內容, 加上可以加Next/Previous制控制文件上一頁/下一頁

2010年5月27日星期四

Word 2010 小功能, 大改善 - Content Control

利用Content Control 來制做電子表單, 加快填表單的速度

1. 因為Word 2010 預設是沒有Developer Tab,所以要在Toolbar 按下滑鼠右鍵, 選擇Customize Ribbon, 剔選Developer


2. 一些Content Options


3. 可以建立拉下選單


4. 剔選方格


5. 插入日期

Word 2010 小功能, 大改善 - Send to PowerPoint

如果要把 Word 的資料放到 PowerPoint 中,多數使用複製&貼上功能,但是,現在Word 2010只要輕輕鬆鬆按一下,就能把Word的資料送到PowerPoint中.

1. 加入Send to PowerPoint 按鈕


2. 準備好的Word 文件, 然後按一下Send to PowerPoint


3. PowerPoint 會自動把Word 資料放進Slide, 還會分開一張一張Slide

Powerpoint 2010 小功能, 大改善 - Broadcast Slide Show

Broadcast Slide Show 是可以把整個Powerpoint 放在網上做Presentation.

1. 按File-->Save&Share--> Broadcast Slide Show


2. 按Start Broadcast


3.用Windows Live ID 登入後做會有一條URL, 把這條URL 分享給其他人, 便可以看到Powerpoint

Powerpoint 2010小功能, 大改善 - Laser Pointer

現在Powerpoint 2010 有內置Laser Pointer 可以給Presentation 時使用, 只要按住CTRL + 滑鼠左鍵, 鼠標做變成Laster Pointer

2010年5月15日星期六

利用Group Policy 部署自訂Office 2010 (2)

現在建立Startup Script 來給GPO 執行, 以下是Script Sample
1. 打開notepad, 複製以下內容並儲存為deployoffice2010.bat
_____________________________________________________________________________________
setlocal

REM *********************************************************************
REM Environment customization begins here. Modify variables below.
REM *********************************************************************

REM Get ProductName from the Office product's core Setup.xml file, and then add "office14." as a prefix.
set ProductName=Office14.PROPLUS

REM Set DeployServer to a network-accessible location containing the Office source files.
set DeployServer=\\FS\Office2010SourceFiles

REM Set ConfigFile to the configuration file to be used for deployment (required)
set ConfigFile=\\FS\Office2010SourceFiles\ProPlus.WW\config.xml

REM Set LogLocation to a central directory to collect log files.
set LogLocation=\\FS\Office2010LogFiles

REM *********************************************************************
REM Deployment code begins here. Do not modify anything below this line.
REM *********************************************************************

IF NOT "%ProgramFiles(x86)%"=="" (goto ARP64) else (goto ARP86)

REM Operating system is X64. Check for 32 bit Office in emulated Wow6432 uninstall key
:ARP64
reg query HKEY_LOCAL_MACHINE\SOFTWARE\WOW6432NODE\Microsoft\Windows\CurrentVersion\Uninstall\%ProductName%
if NOT %errorlevel%==1 (goto End)

REM Check for 32 and 64 bit versions of Office 2010 in regular uninstall key.(Office 64bit would also appear here on a 64bit OS)
:ARP86
reg query HKEY_LOCAL_MACHINE\SOFTWARE\Microsoft\Windows\CurrentVersion\Uninstall\%ProductName%
if %errorlevel%==1 (goto DeployOffice) else (goto End)

REM If 1 returned, the product was not found. Run setup here.
:DeployOffice
start /wait %DeployServer%\setup.exe /config %ConfigFile%
echo %date% %time% Setup ended with error code %errorlevel%. >> %LogLocation%\%computername%.txt

REM If 0 or other was returned, the product was found or another error occurred. Do nothing.
:End

Endlocal
_____________________________________________________________________________________


2. 複製deployoffice2010.bat 到Startup Folder


3. 打開Active Directory Users and Computers,在要部署Office 2010的OU,新增一個GPO - DeployOffice2010


4. 在Computer Configuration|Windows Settings|Scripts (Startup/Shutdown)|Startup 加入DeployOffice2010.bat


5. 在Computer Configuration|Administrative Templates|System|Scripts, 設定Script


6. 執行gpupdate /force 套用新GPO, 開啟Client 電腦,便會自動安裝Office 2010


利用Group Policy 部署自訂Office 2010 (1)

剛剛Office 2010 正式啟動, 現在開始準備部署Office 2010, 如果要手動大量部署給客戶, 會費時失事, 我們可以利用Office Customization Tool 來自訂安裝套件,再用GPO 執行Startup Script 發佈給客戶.

Server Side: Windows Server 2003 R2 With Active Directory
Client Side: Windows XP Pro and Windows 7
1. 下載Office 2010 ProPlus Beta 版, 儲存在C:MSOFFICE2010


2. 打開CMD, 執行以下指令Extract 安裝檔案到C:\Office2010SourceFiles


3. 輸入Setup.exe /admin 打開Office Customization Tool (OCT)


4. 建立新的安裝自訂檔案


5. 根據不同選項做出修改


6. SAVE 後把.msp 檔案儲存到C:\Office2010SourceFiles\Updates 的Folder 裹